原理
Shopify App 本质上是一个 独立的 Web 应用,但可以嵌入到 Shopify 后台(Admin)或店铺前端(Online Store)。 你可以选择用 Remix + Node.js,或者 PHP(Laravel、Slim 等)。
🔹 传统 PHP 实现 Shopify App
- 1️⃣ Shopify 后台 → 访问你的 PHP 服务器(Admin API / Storefront API)
- 2️⃣ PHP 处理请求,查询数据库
- 3️⃣ PHP 渲染 HTML,返回给 Shopify
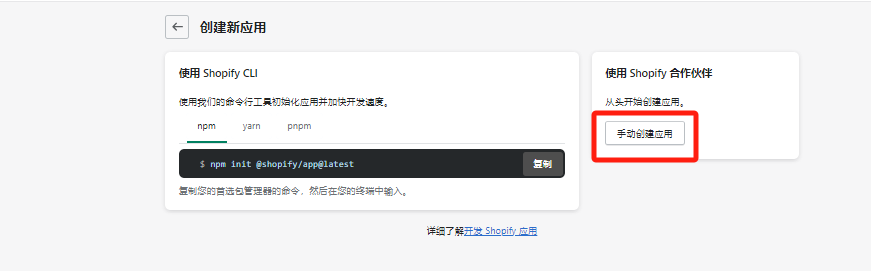
手动创建应用
配置应用信息

让Shopify Cli识别现有项目
先创建 Shopify App 配置
在 PHP 项目根目录手动创建 shopify.app.toml 文件:
|
|
然后在 shopify.app.toml 里添加:
|
|
初始化 package.json 文件
在根目录生成一个空壳 package.json:
|
|
或者运行:
|
|
这会生成:
|
|
📌 这样 Shopify CLI 就能识别你的 PHP 项目是一个 Shopify App 了!
然后,再运行:
|
|
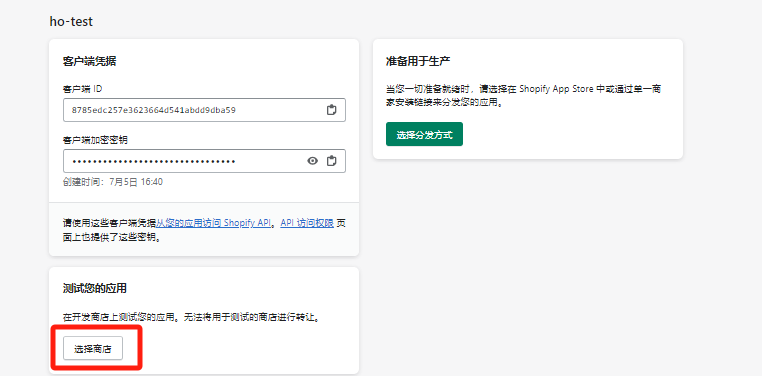
选择测试商店
如何添加 Theme App Extension
什么是 Theme App Extension?
Theme App Extension 允许你的 Shopify App 自动在商店的 Liquid 主题里添加代码,比如 插入翻译 JS、按钮、HTML 片段 等,而无需商家手动修改代码。
PHP Shopify App 添加 Theme App Extension 的步骤
🔹在 Shopify CLI 里创建 Theme App Extension
你的 PHP App 是后台,Theme App Extension 需要单独用 Shopify CLI 创建。
1️⃣ 进入你的 PHP App 目录
|
|
2️⃣ 使用 Shopify CLI 创建 Theme App Extension
|
|
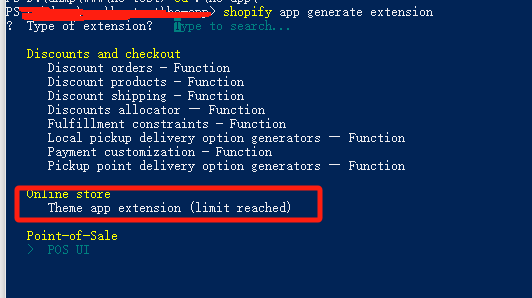
📌 这里选择 Theme app extension 主题扩展。然后根据提示输入扩展的名称
3️⃣ 进入新创建的扩展目录
|
|
4️⃣ 运行开发模式(用于本地预览)
|
|
📌 这样 Shopify 主题就可以加载你的 Theme App Extension 进行测试。
🔹修改 Theme App Extension 的 Liquid 代码
创建扩展后,你会看到 blocks/ 目录,里面有 .liquid 文件。
你可以添加 一个翻译切换组件,让用户点击切换语言:
|
|
📌 这段代码会被插入到店铺主题里,让用户可以点击按钮切换语言。
🔹让 PHP 处理语言切换
在 Laravel 后端,添加一个 路由来处理翻译切换:
📌 routes/web.php
|
|
📌 这会在 Session 里存储语言信息,然后你的 Laravel API 就可以返回不同语言的数据。
🔹在 PHP 里修改 API 响应
如果你的 PHP App 需要返回不同语言的数据,你可以在 API 里动态返回翻译内容:
📌 routes/api.php
|
|
📌 这样,你的前端可以调用 /api/translations 来获取翻译后的内容。
🔹部署 Theme App Extension
1️⃣ 构建扩展
|
|
2️⃣ 提交扩展
|
|
3️⃣ 在 Shopify Partner Dashboard 里发布
- 进入 Shopify Partner Dashboard
- 进入你的 App
- 在 App Extensions 里找到 Theme App Extension
- 点击 发布
📌 这样,商家安装你的 App 后,扩展就会自动出现在他们的主题里!